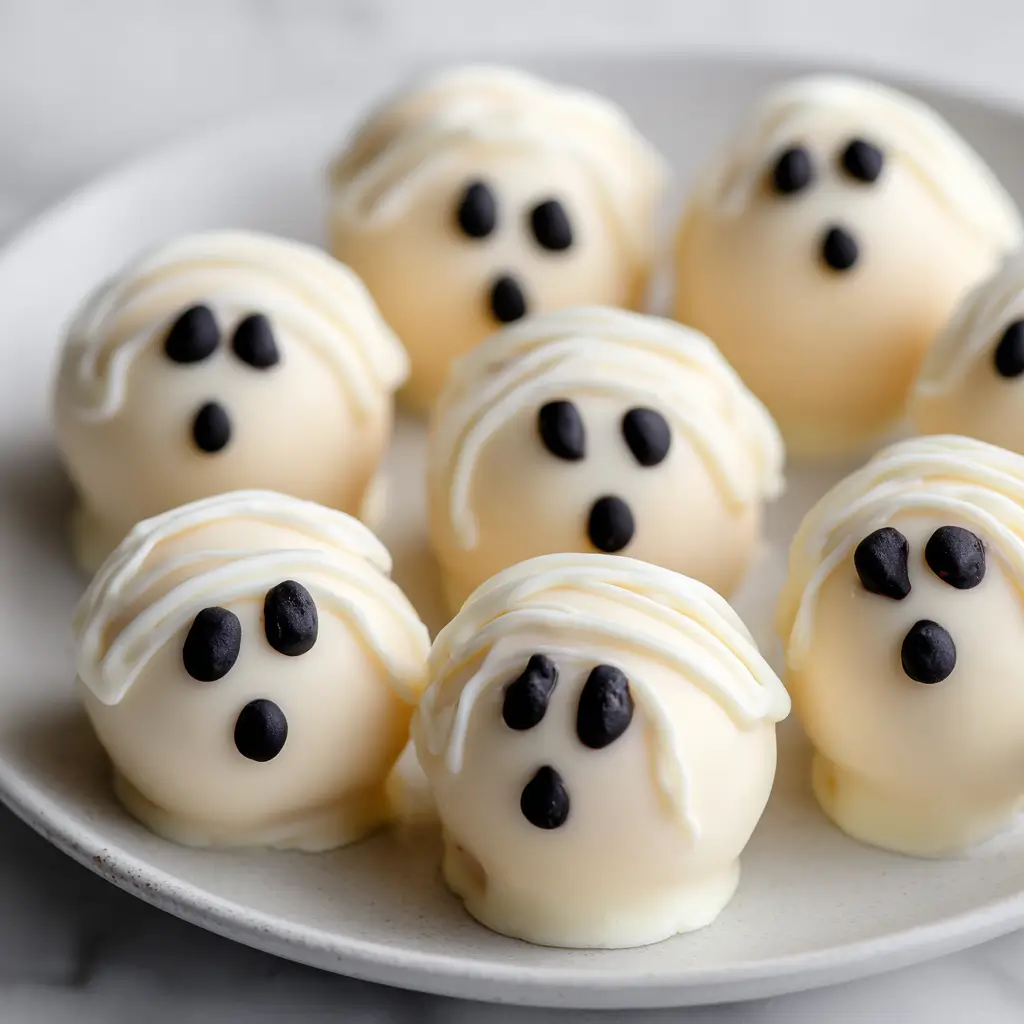
No-Bake Oreo Ghost Truffles for a Sweet Scare
Are you ready to impress your friends and family with a spooky treat that’s both delicious and easy to make? Did you know that over 70% of people prefer no-bake desserts during the Halloween season because they save time and effort? If you’re looking for a fun and delectable recipe, No-Bake Oreo Ghost Truffles for a Sweet Scare is the perfect choice. These delightful truffles combine the rich flavor of Oreos with the whimsical charm of ghostly decorations, making them an ideal treat for Halloween parties or cozy family gatherings.
Ingredients List
To create these delightful No-Bake Oreo Ghost Truffles for a Sweet Scare, you will need the following ingredients:
- 1 package (15.5 oz) Oreo cookies (regular or gluten-free)
- 8 oz cream cheese (softened)
- 12 oz white chocolate chips (or candy melts)
- Black edible marker or chocolate icing for decoration
- Optional: A sprinkle of sea salt for a sweet-salty contrast
Substitution Suggestions:
- Cream Cheese: Use vegan cream cheese for a dairy-free version.
- White Chocolate: Substitute with dark chocolate for a richer flavor.
- Oreo Cookies: Try using flavored Oreos, such as mint or peanut butter, for a unique twist.
Step-by-Step Instructions
Step 1: Crush the Oreos
Start by placing the Oreo cookies in a food processor. Pulse until they are finely crushed, resembling a coarse powder. This step is essential for achieving a smooth truffle texture. If you don’t have a food processor, you can place the cookies in a zip-top bag and crush them with a rolling pin.
Step 2: Mix with Cream Cheese
In a mixing bowl, combine the crushed Oreos with the softened cream cheese. Use a spatula or your hands to mix until fully combined. The mixture should be thick and moldable. This step is crucial for creating the truffle’s creamy center.
Step 3: Form the Truffles
Using your hands, scoop out about one tablespoon of the Oreo mixture and roll it into a ball. Repeat this process until all the mixture is shaped into balls. You should have about 20-24 truffles. Place the rolled truffles on a baking sheet lined with parchment paper.
Step 4: Chill the Truffles
Cover the baking sheet with plastic wrap and refrigerate the truffles for at least 30 minutes. Chilling helps them firm up, making them easier to dip in chocolate.
Step 5: Melt the White Chocolate
While the truffles chill, melt the white chocolate chips in a microwave-safe bowl. Heat in 30-second intervals, stirring in between, until smooth and fully melted. Be careful not to overheat, as this can cause the chocolate to seize.
Step 6: Dip the Truffles
Once the truffles are chilled, remove them from the refrigerator. Using a fork, dip each truffle into the melted white chocolate, ensuring it is fully coated. Let the excess chocolate drip off before placing it back on the parchment paper.
Step 7: Decorate with Ghost Faces
Before the chocolate sets, use a black edible marker or chocolate icing to draw ghost faces on each truffle. This is where you can get creative—make them spooky or silly!
Step 8: Final Chill
Allow the decorated truffles to set in the refrigerator for another 15-20 minutes until the chocolate coating is firm.

Nutritional Information
Here’s a breakdown of the nutritional information for one No-Bake Oreo Ghost Truffle (based on 24 servings):
| Nutrient | Amount per Truffle |
|---|---|
| Calories | 130 |
| Protein | 1g |
| Carbohydrates | 18g |
| Fat | 7g |
| Sugar | 8g |
These truffles are a delightful treat, perfect for satisfying your sweet tooth!
Healthier Alternatives for the Recipe
If you’re looking to make your No-Bake Oreo Ghost Truffles for a Sweet Scare a bit healthier, consider these modifications:
- Use Low-Fat Cream Cheese: This can reduce the overall fat content while still providing creaminess.
- Dark Chocolate Coating: Opt for dark chocolate, which contains antioxidants and can be a healthier alternative.
- Add Nuts: Incorporate finely chopped nuts for added texture and nutrition.
Serving Suggestions
These ghostly truffles can be served in various fun ways:
- On a Spooky Platter: Arrange the truffles on a Halloween-themed platter for a festive display.
- With a Side of Fruit: Pair with fresh fruit like strawberries or apple slices for a balanced treat.
- In Gift Bags: Package them in clear bags tied with orange ribbons for a charming party favor.
Common Mistakes to Avoid
Here are some common pitfalls when making No-Bake Oreo Ghost Truffles and how to avoid them:
- Not Chilling Enough: Ensure the truffles are adequately chilled before dipping. This prevents them from falling apart in the chocolate.
- Overheating Chocolate: Melt chocolate slowly and in short intervals to avoid seizing.
- Skipping the Decoration: The ghost faces are what make these truffles special, so don’t skip this fun step!
Storing Tips for the Recipe
To keep your No-Bake Oreo Ghost Truffles fresh, follow these storage tips:
- Refrigeration: Store the truffles in an airtight container in the refrigerator for up to one week.
- Freezing: For longer storage, freeze the truffles in a single layer, then transfer to a freezer-safe container. They can last up to three months. Thaw in the refrigerator before serving.
Conclusion
In summary, No-Bake Oreo Ghost Truffles for a Sweet Scare are a delightful and easy treat perfect for Halloween festivities. With minimal effort and maximum flavor, these truffles are sure to impress your guests. Try this recipe today, and don’t forget to share your feedback in the comments or subscribe for more delicious updates!
FAQs
Can I make these truffles ahead of time?
Yes! You can prepare the truffles a day in advance and store them in the refrigerator until you’re ready to serve.
What can I use instead of Oreos?
You can use any chocolate sandwich cookies or even gluten-free cookies if you have dietary restrictions.
How do I get the chocolate to stay smooth while dipping?
Ensure your chocolate is melted properly and consider adding a teaspoon of coconut oil to keep it smooth.

No-Bake Oreo Ghost Truffles for a Sweet Scare
Ingredients
- 1 package (15.5 oz) Oreo cookies (regular or gluten-free)
- 8 oz cream cheese (softened)
- 12 oz white chocolate chips (or candy melts)
- Black edible marker or chocolate icing for decoration
- Optional: A sprinkle of sea salt for a sweet-salty contrast
- Substitution Suggestions:
- Cream Cheese: Use vegan cream cheese for a dairy-free version.
- White Chocolate: Substitute with dark chocolate for a richer flavor.
- Oreo Cookies: Try using flavored Oreos, such as mint or peanut butter, for a unique twist.
Instructions
Step 1: Crush the Oreos
Start by placing the Oreo cookies in a food processor. Pulse until they are finely crushed, resembling a coarse powder. This step is essential for achieving a smooth truffle texture. If you don’t have a food processor, you can place the cookies in a zip-top bag and crush them with a rolling pin.
Step 2: Mix with Cream Cheese
In a mixing bowl, combine the crushed Oreos with the softened cream cheese. Use a spatula or your hands to mix until fully combined. The mixture should be thick and moldable. This step is crucial for creating the truffle's creamy center.
Step 3: Form the Truffles
Using your hands, scoop out about one tablespoon of the Oreo mixture and roll it into a ball. Repeat this process until all the mixture is shaped into balls. You should have about 20-24 truffles. Place the rolled truffles on a baking sheet lined with parchment paper.
Step 4: Chill the Truffles
Cover the baking sheet with plastic wrap and refrigerate the truffles for at least 30 minutes. Chilling helps them firm up, making them easier to dip in chocolate.
Step 5: Melt the White Chocolate
While the truffles chill, melt the white chocolate chips in a microwave-safe bowl. Heat in 30-second intervals, stirring in between, until smooth and fully melted. Be careful not to overheat, as this can cause the chocolate to seize.
Step 6: Dip the Truffles
Once the truffles are chilled, remove them from the refrigerator. Using a fork, dip each truffle into the melted white chocolate, ensuring it is fully coated. Let the excess chocolate drip off before placing it back on the parchment paper.
Step 7: Decorate with Ghost Faces
Before the chocolate sets, use a black edible marker or chocolate icing to draw ghost faces on each truffle. This is where you can get creative—make them spooky or silly!
Step 8: Final Chill
Allow the decorated truffles to set in the refrigerator for another 15-20 minutes until the chocolate coating is firm