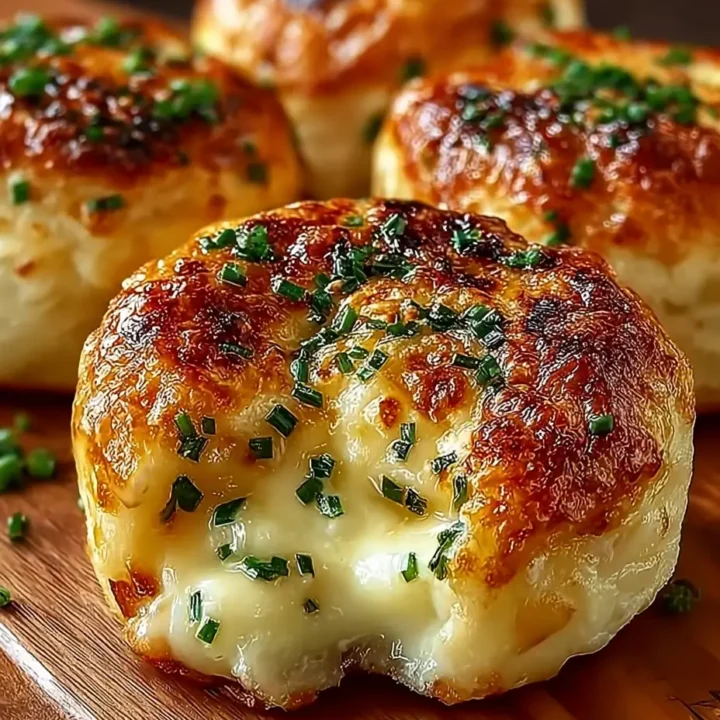
Garlic Butter Cheese Bombs: A Deliciously Cheesy Treat
Introduction
Are you looking for an irresistible appetizer that combines the flavors of garlic, butter, and gooey cheese? Look no further than Garlic Butter Cheese Bombs! These delightful bites are perfect for parties, game days, or simply as a tasty snack at home. With a golden, flaky exterior and a warm, cheesy center, these bombs are sure to impress your guests and become a household favorite. Did you know that cheese is not only delicious but also a great source of calcium and protein? Let’s dive into how to make these scrumptious treats!
Ingredients List
For the Cheese Bombs:
- 1 can (16 oz) refrigerated biscuit dough: For a flaky base.
- 1 cup shredded mozzarella cheese: For gooeyness.
- 1/2 cup cream cheese: Softened for easy mixing.
- 1 teaspoon Italian seasoning: For added flavor.
- 1/2 teaspoon garlic powder: To enhance the garlic flavor.
For the Garlic Butter:
- 1/2 cup unsalted butter: Melted, for richness.
- 3 cloves garlic: Minced, for a robust garlic flavor.
- 1/4 teaspoon salt: To taste.
- 1/4 teaspoon parsley: Chopped, for garnish (optional).
Timing
Preparing Garlic Butter Cheese Bombs is quick and easy:
- Preparation Time: 15 minutes
- Cooking Time: 15 minutes
- Total Time: Approximately 30 minutes, making it a perfect choice for a last-minute appetizer.
Step-by-Step Instructions
Step 1: Preheat the Oven
- Preheat Oven: Preheat your oven to 375°F (190°C) and line a baking sheet with parchment paper.
Step 2: Prepare the Cheese Filling
- Mix Cheese: In a medium bowl, combine 1 cup of shredded mozzarella cheese, 1/2 cup of softened cream cheese, 1 teaspoon of Italian seasoning, and 1/2 teaspoon of garlic powder. Mix until well combined.
Step 3: Form the Cheese Bombs
- Prepare Biscuit Dough: Open the can of refrigerated biscuit dough and separate the biscuits.
- Fill Biscuits: Take one biscuit and flatten it slightly in your hand. Place about 1 tablespoon of the cheese mixture in the center.
- Seal the Biscuits: Fold the edges of the biscuit over the cheese filling and pinch to seal tightly. Roll it into a ball and place it seam-side down on the prepared baking sheet. Repeat with the remaining biscuits and filling.
Step 4: Make the Garlic Butter
- Melt Butter: In a small bowl, melt 1/2 cup of unsalted butter in the microwave or on the stovetop.
- Add Garlic: Stir in 3 cloves of minced garlic and 1/4 teaspoon of salt until well combined.
Step 5: Bake the Cheese Bombs
- Brush with Garlic Butter: Using a pastry brush, generously brush the garlic butter mixture over each cheese bomb.
- Bake: Place the baking sheet in the preheated oven and bake for 15 minutes, or until the cheese bombs are golden brown.
Step 6: Serve
- Garnish and Enjoy: Remove from the oven and let cool slightly. If desired, sprinkle with chopped parsley before serving. Enjoy warm!
Notes
- Storage: Leftover cheese bombs can be stored in an airtight container in the refrigerator for up to 3 days. Reheat in the oven for best results.
- Variations: Feel free to experiment with different cheeses like cheddar, pepper jack, or even add cooked bacon bits for extra flavor.
- Common Mistakes: Ensure the biscuits are sealed tightly to prevent the cheese from leaking out during baking.
Nutritional Information
Here’s a breakdown of the nutritional content per serving (based on 8 servings):
| Nutrient | Amount per Serving |
|---|---|
| Calories | 220 |
| Protein | 6g |
| Fat | 15g |
| Carbohydrates | 18g |
| Fiber | 0g |
| Sugar | 1g |
Note: Nutritional values may vary based on specific brands and ingredient choices.
Healthier Alternatives for the Recipe
To make your Garlic Butter Cheese Bombs even healthier, consider these modifications:
- Use Whole Wheat Biscuits: Opt for whole wheat biscuit dough for added fiber.
- Low-Fat Cheese: Substitute regular cheese with low-fat cheese options to reduce calories.
- Add Vegetables: Incorporate finely chopped spinach or bell peppers into the cheese mixture for added nutrients.
Serving Suggestions
Enhance your cheese bomb experience with these serving suggestions:
- Serve with Dipping Sauce: Pair with marinara sauce, ranch dressing, or a spicy aioli for dipping.
- Accompany with Salad: A fresh side salad can balance the richness of the cheese bombs.
- Pair with Beer or Wine: These cheesy treats pair well with a light beer or a crisp white wine.
Common Mistakes to Avoid
- Overfilling the Biscuits: Avoid adding too much filling, as it can cause the biscuits to burst open during baking.
- Not Sealing Properly: Ensure the edges are sealed tightly to keep the cheese inside while baking.
- Skipping the Garlic Butter: The garlic butter adds essential flavor; don’t skip this step!
Storing Tips for the Recipe
- Refrigeration: Store leftovers in an airtight container in the refrigerator for up to 3 days.
- Freezing: You can freeze unbaked cheese bombs for up to 1 month. Bake from frozen, adding a few extra minutes to the baking time.
- Prepping Ahead: You can prepare the cheese filling in advance and assemble the bombs just before baking.
Conclusion
In summary, Garlic Butter Cheese Bombs are a delicious and easy appetizer that will delight your guests and satisfy your cravings. With their gooey cheese center and buttery garlic flavor, they are sure to become a favorite in your household. Give this recipe a try, and don’t forget to share your feedback in the comments or subscribe for more delicious updates!
FAQs
Can I use a different type of biscuit dough?
Yes! You can use flaky pastry dough or homemade biscuit dough if you prefer.
What can I substitute for cream cheese?
You can use ricotta cheese or a soft cheese spread as an alternative.
Can I make these ahead of time?
Yes! You can prepare the cheese bombs in advance and bake them just before serving.
How do I reheat leftovers?
Reheat in the oven at 350°F (175°C) for about 10 minutes, or until warmed through.
Can I add other ingredients to the filling?
Absolutely! Feel free to add cooked sausage, herbs, or vegetables for extra flavor.
Now that you have all the details, it’s time to get cooking! Enjoy your Garlic Butter Cheese Bombs and the delightful flavors they bring to your table!
Garlic Butter Cheese Bombs: A Deliciously Cheesy Treat
Ingredients
- For the Cheese Bombs:
- 1 can (16 oz) refrigerated biscuit dough: For a flaky base.
- 1 cup shredded mozzarella cheese: For gooeyness.
- 1/2 cup cream cheese: Softened for easy mixing.
- 1 teaspoon Italian seasoning: For added flavor.
- 1/2 teaspoon garlic powder: To enhance the garlic flavor.
- For the Garlic Butter:
- 1/2 cup unsalted butter: Melted, for richness.
- 3 cloves garlic: Minced, for a robust garlic flavor.
- 1/4 teaspoon salt: To taste.
- 1/4 teaspoon parsley: Chopped, for garnish (optional).
Instructions
- Preheat Oven: Preheat your oven to 375°F (190°C) and line a baking sheet with parchment paper.
- Mix Cheese: In a medium bowl, combine 1 cup of shredded mozzarella cheese, 1/2 cup of softened cream cheese, 1 teaspoon of Italian seasoning, and 1/2 teaspoon of garlic powder. Mix until well combined.
- Prepare Biscuit Dough: Open the can of refrigerated biscuit dough and separate the biscuits.
- Fill Biscuits: Take one biscuit and flatten it slightly in your hand. Place about 1 tablespoon of the cheese mixture in the center.
- Seal the Biscuits: Fold the edges of the biscuit over the cheese filling and pinch to seal tightly. Roll it into a ball and place it seam-side down on the prepared baking sheet. Repeat with the remaining biscuits and filling.
- Melt Butter: In a small bowl, melt 1/2 cup of unsalted butter in the microwave or on the stovetop.
- Add Garlic: Stir in 3 cloves of minced garlic and 1/4 teaspoon of salt until well combined.
- Brush with Garlic Butter: Using a pastry brush, generously brush the garlic butter mixture over each cheese bomb.
- Bake: Place the baking sheet in the preheated oven and bake for 15 minutes, or until the cheese bombs are golden brown.
- Garnish and Enjoy: Remove from the oven and let cool slightly. If desired, sprinkle with chopped parsley before serving. Enjoy warm!
Step 1: Preheat the Oven
Step 2: Prepare the Cheese Filling
Step 3: Form the Cheese Bombs
Step 4: Make the Garlic Butter
Step 5: Bake the Cheese Bombs
Step 6: Serve
Notes
- Variations: Feel free to experiment with different cheeses like cheddar, pepper jack, or even add cooked bacon bits for extra flavor.
- Common Mistakes: Ensure the biscuits are sealed tightly to prevent the cheese from leaking out during baking.