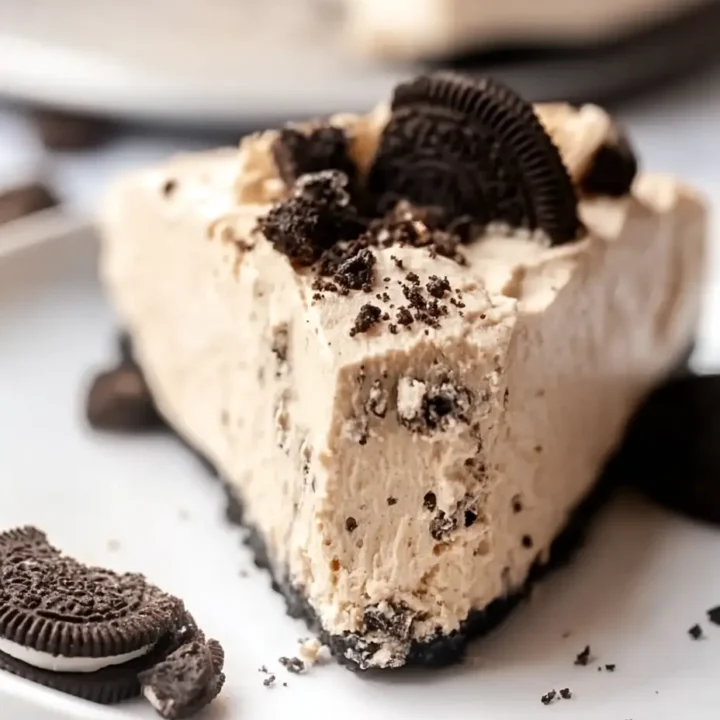
Peanut Butter Oreo Pie: A Decadent Dessert
Introduction
Indulge your sweet tooth with this Peanut Butter Oreo Pie! This no-bake dessert features a rich and creamy peanut butter filling, a crunchy Oreo crust, and a delightful topping that will satisfy any dessert lover. Perfect for parties, gatherings, or a special treat at home, this pie is easy to make and incredibly delicious. Let’s dive into this irresistible recipe!
Ingredients List
To make your Peanut Butter Oreo Pie, you will need the following ingredients:
For the Oreo Crust:
- 24 Oreo cookies: Crushed into fine crumbs.
- 1/4 cup of unsalted butter: Melted.
For the Peanut Butter Filling:
- 1 cup of creamy peanut butter: Use your favorite brand.
- 1 cup of powdered sugar: For sweetness and creaminess.
- 8 oz of cream cheese: Softened to room temperature.
- 1 teaspoon of vanilla extract: For flavor.
- 1 cup of whipped topping: Thawed (like Cool Whip).
For the Topping:
- 1/2 cup of whipped topping: For spreading on top.
- Chocolate syrup: For drizzling (optional).
- Crushed Oreos: For garnish (optional).
Timing
Preparation for this Peanut Butter Oreo Pie is quick and easy! Here’s a breakdown of the timing:
- Preparation Time: 15 minutes
- Chilling Time: 2 hours (or until set)
- Total Time: Approximately 2 hours and 15 minutes
This dessert is perfect for any occasion and can be made ahead of time!
Step-by-Step Instructions
Step 1: Prepare the Oreo Crust
- In a mixing bowl, combine the crushed Oreo cookies and melted butter. Mix until the crumbs are evenly coated.
- Press the mixture firmly into the bottom and up the sides of a 9-inch pie dish to form the crust. Use the back of a measuring cup or your fingers to ensure it’s compact.
- Place the crust in the refrigerator to set while you prepare the filling.
Step 2: Make the Peanut Butter Filling
- In a large mixing bowl, beat the softened cream cheese with an electric mixer until smooth and creamy.
- Add the peanut butter, powdered sugar, and vanilla extract. Mix until well combined and smooth.
- Gently fold in the whipped topping until fully incorporated, being careful not to deflate the mixture.
Step 3: Assemble the Pie
- Remove the Oreo crust from the refrigerator. Spoon the peanut butter filling into the crust, spreading it evenly with a spatula.
- Smooth the top with the spatula.
Step 4: Chill the Pie
- Cover the pie with plastic wrap and refrigerate for at least 2 hours, or until set.
Step 5: Add the Topping
- Once the pie is set, spread the remaining whipped topping over the top.
- Drizzle with chocolate syrup and sprinkle crushed Oreos on top for garnish if desired.
Step 6: Serve and Enjoy
- Slice the pie and serve chilled. Enjoy the delicious combination of peanut butter and Oreo flavors!
Notes
Tips and Substitutions
- Storage Instructions: Store any leftovers in an airtight container in the refrigerator for up to 4 days.
- Common Mistakes: Ensure the cream cheese is softened to room temperature for a smooth filling.
- Variations: You can add chopped peanuts or chocolate chips to the filling for added texture.
Nutritional Information
Here’s a breakdown of the nutritional information per serving (based on 8 servings):
- Calories: 350
- Protein: 6g
- Fat: 22g
- Carbohydrates: 32g
- Fiber: 1g
- Sugar: 18g
This recipe offers a rich and indulgent treat that is sure to please!
Healthier Alternatives for the Recipe
If you’re looking to make your Peanut Butter Oreo Pie a bit healthier, consider these alternatives:
- Reduced-Fat Cream Cheese: Use reduced-fat cream cheese to cut down on calories.
- Natural Peanut Butter: Opt for natural peanut butter without added sugars or oils.
- Sugar Substitute: Use a sugar substitute for the powdered sugar to reduce sweetness.
Serving Suggestions
To elevate your Peanut Butter Oreo Pie, consider these serving suggestions:
- With Ice Cream: Serve with a scoop of vanilla or chocolate ice cream for an extra treat.
- Peanut Butter Drizzle: Drizzle additional melted peanut butter on top for extra flavor.
- Fresh Fruit: Serve with fresh berries for a refreshing contrast.
Common Mistakes to Avoid
Here are some common pitfalls to watch out for when making Peanut Butter Oreo Pie:
- Not Chilling Long Enough: Allow enough time for the pie to set in the refrigerator for the best texture.
- Using Cold Cream Cheese: Make sure the cream cheese is at room temperature for a smooth filling.
- Overmixing the Filling: Be gentle when folding in the whipped topping to maintain lightness.
Storing Tips for the Recipe
For optimal freshness, follow these storing tips:
- Refrigeration: Store leftovers in an airtight container in the fridge for up to 4 days.
- Freezing: This pie can be frozen for up to 2 months. Thaw in the refrigerator before serving.
- Reheating: This dessert is best served cold, so no reheating is necessary.
Conclusion
In summary, Peanut Butter Oreo Pie is a decadent and delicious dessert that’s easy to make and perfect for any occasion. With its rich flavors and creamy texture, it’s sure to be a hit with family and friends. Give this recipe a try, and let us know how you enjoyed it in the comments! For more delightful recipes and cooking tips, subscribe to our blog for the latest updates.
FAQs
1. Can I use crunchy peanut butter instead of creamy?
Yes, crunchy peanut butter can be used for added texture.
2. How do I store leftovers?
Store leftovers in an airtight container in the refrigerator for up to 4 days.
3. Can I make this pie ahead of time?
Absolutely! This pie can be made a day in advance and stored in the refrigerator until ready to serve.
4. What can I serve with this pie?
It pairs well with ice cream, whipped cream, or fresh fruit.
5. Can I add chocolate to the filling?
Yes, you can mix in chocolate chips or melted chocolate for a richer flavor.
Peanut Butter Oreo Pie: A Decadent Dessert
Ingredients
- For the Oreo Crust:
- 24 Oreo cookies: Crushed into fine crumbs.
- 1/4 cup of unsalted butter: Melted.
- For the Peanut Butter Filling:
- 1 cup of creamy peanut butter: Use your favorite brand.
- 1 cup of powdered sugar: For sweetness and creaminess.
- 8 oz of cream cheese: Softened to room temperature.
- 1 teaspoon of vanilla extract: For flavor.
- 1 cup of whipped topping: Thawed (like Cool Whip).
- For the Topping:
- 1/2 cup of whipped topping: For spreading on top.
- Chocolate syrup: For drizzling (optional).
- Crushed Oreos: For garnish (optional).
Instructions
- In a mixing bowl, combine the crushed Oreo cookies and melted butter. Mix until the crumbs are evenly coated.
- Press the mixture firmly into the bottom and up the sides of a 9-inch pie dish to form the crust. Use the back of a measuring cup or your fingers to ensure it’s compact.
- Place the crust in the refrigerator to set while you prepare the filling.
- In a large mixing bowl, beat the softened cream cheese with an electric mixer until smooth and creamy.
- Add the peanut butter, powdered sugar, and vanilla extract. Mix until well combined and smooth.
- Gently fold in the whipped topping until fully incorporated, being careful not to deflate the mixture.
- Remove the Oreo crust from the refrigerator. Spoon the peanut butter filling into the crust, spreading it evenly with a spatula.
- Smooth the top with the spatula.
- Cover the pie with plastic wrap and refrigerate for at least 2 hours, or until set.
- Once the pie is set, spread the remaining whipped topping over the top.
- Drizzle with chocolate syrup and sprinkle crushed Oreos on top for garnish if desired.
- Slice the pie and serve chilled. Enjoy the delicious combination of peanut butter and Oreo flavors!