
No Bake Moose Farts
Have you ever wondered how a dessert could be both delicious and whimsically named? No bake moose farts are a fun and indulgent treat that challenges the norms of traditional desserts. This playful recipe combines creamy textures and rich flavors without the need for an oven, making it perfect for those hot summer days or when you’re short on time. According to dessert trend reports, no-bake recipes have gained popularity due to their simplicity and quick preparation time, appealing to both novice and experienced cooks alike. Let’s explore how to make this delightful dessert that will surely impress your friends and family!
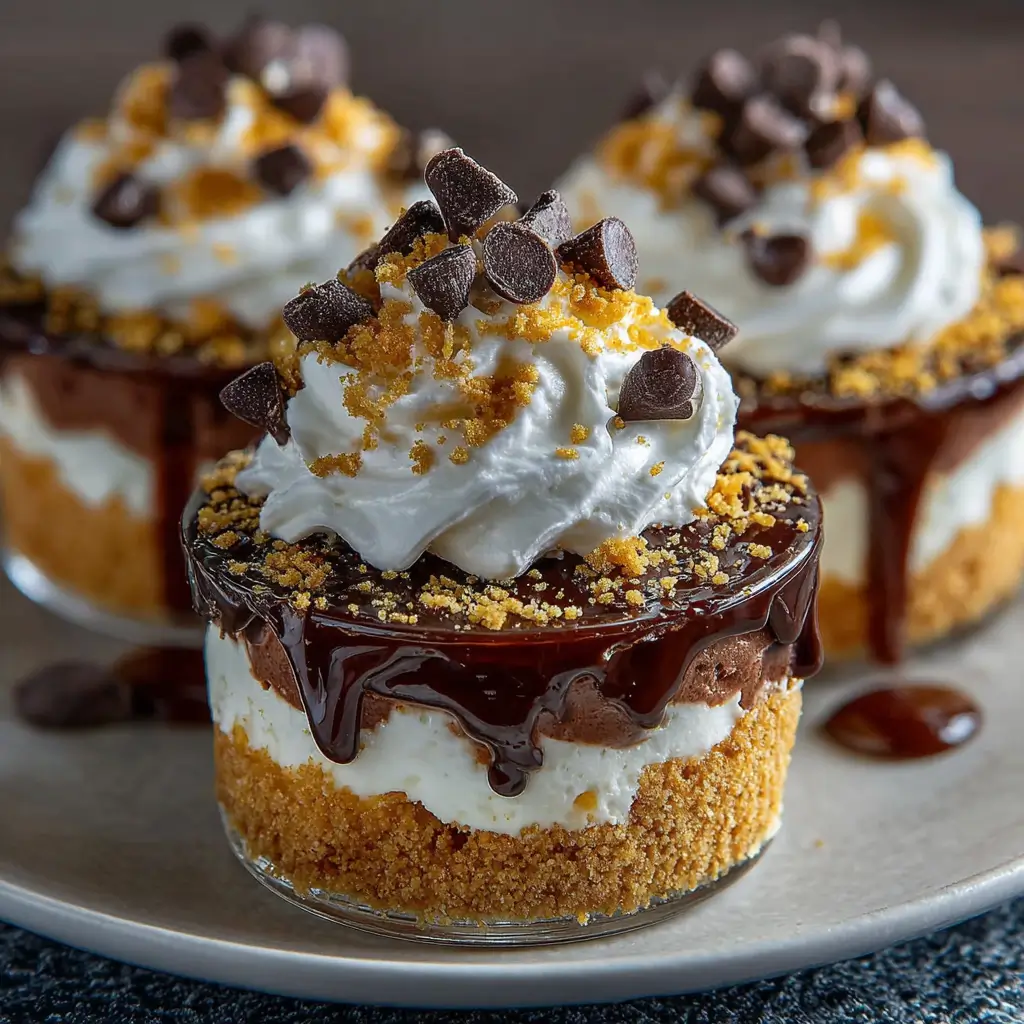
Ingredients List
To create your own no bake moose farts, gather the following ingredients:
- Cream cheese (8 oz, softened): Provides a rich and creamy base.
- Powdered sugar (1 cup): Sweetens the mixture perfectly.
- Whipped topping (8 oz): Adds lightness and fluffiness.
- Chocolate pudding mix (3.9 oz): For a rich chocolate flavor.
- Milk (2 cups): To mix with the pudding for a smooth texture.
- Graham cracker crumbs (1 cup): For a crunchy base.
- Chocolate chips (1/2 cup, optional): For added texture and sweetness.
Substitutions:
- For a dairy-free option, use vegan cream cheese and coconut whipped topping.
- Substitute the chocolate pudding with vanilla for a different flavor profile.
Step-by-Step Instructions
Step 1: Prepare the Cream Cheese Mixture
In a large mixing bowl, beat the softened cream cheese and powdered sugar together until smooth and creamy. This forms the base of your dessert and ensures a delightful texture.
Step 2: Add Whipped Topping
Gently fold in the whipped topping until fully incorporated. This step adds a light and airy quality to the mixture, making it irresistibly fluffy.
Step 3: Mix the Pudding
In a separate bowl, combine the chocolate pudding mix and milk. Whisk until the mixture thickens, which should take about 2 minutes. This will create a rich chocolate layer in your dessert.
Step 4: Combine Mixtures
Once the pudding is ready, fold it into the cream cheese mixture. Be careful not to overmix; you want to maintain the lightness of the whipped topping.
Step 5: Layer the Dessert
In a serving dish or individual cups, create layers starting with graham cracker crumbs, followed by the cream cheese and pudding mixture. Repeat the layers until all ingredients are used, finishing with a layer of the cream cheese mixture on top.
Step 6: Chill
Cover the dessert with plastic wrap and refrigerate for at least 2 hours to allow it to set. This chilling time is essential for the flavors to meld and the dessert to firm up.
Step 7: Serve and Enjoy
Before serving, sprinkle chocolate chips on top for added flair. Scoop out portions and enjoy the delightful combination of creamy, chocolatey goodness!
Nutritional Information
Here’s a quick overview of the nutritional content for one serving (about 1/4 cup):
- Calories: 250
- Total Fat: 12g
- Saturated Fat: 7g
- Cholesterol: 30mg
- Sodium: 150mg
- Total Carbohydrates: 33g
- Dietary Fiber: 1g
- Sugars: 20g
- Protein: 3g
Healthier Alternatives for the Recipe
If you’re looking to make this dessert a bit healthier, consider these alternatives:
- Use low-fat cream cheese: This reduces the overall fat content without sacrificing flavor.
- Opt for sugar-free pudding mix: This can significantly cut down on sugar while still providing great taste.
- Add fruit: Incorporate fresh berries or sliced bananas for natural sweetness and added nutrients.
Serving Suggestions
No bake moose farts can be served in various ways to delight your guests:
- Individual Cups: Serve in small cups for a fun, portion-controlled treat.
- Garnish Ideas: Top with fresh whipped cream or a drizzle of chocolate sauce for an extra touch.
- Pairing: Serve alongside coffee or tea for a delightful afternoon snack.
Common Mistakes to Avoid
- Not Softening the Cream Cheese: Ensure the cream cheese is at room temperature for easy mixing and a smoother texture.
- Skipping the Chilling Time: Allowing the dessert to chill is crucial for the best flavor and consistency.
- Overmixing: Be gentle when folding in the whipped topping and pudding mix to maintain the light texture.
Storing Tips for the Recipe
To keep your no bake moose farts fresh:
- Cover and Refrigerate: Store in an airtight container in the refrigerator for up to 3 days.
- Freeze for Longer Storage: If you want to keep it longer, consider freezing individual portions. Just remember to let it thaw in the refrigerator before serving.
Conclusion
No bake moose farts are a whimsical and delicious dessert that’s easy to make and perfect for any occasion. With minimal prep time and no baking required, this treat is sure to impress your guests. Give this recipe a try and share your thoughts in the comments section below! Don’t forget to subscribe for more delightful recipes and updates!
FAQs
Can I make this dessert ahead of time?
Yes! No bake moose farts can be prepared a day in advance, making it a great option for parties.
Is it possible to use different flavors of pudding?
Absolutely! Feel free to experiment with different pudding flavors like vanilla or butterscotch for a unique twist.
How long do leftovers last?
When stored properly in the refrigerator, leftovers will last for up to 3 days.

No Bake Moose Farts
Ingredients
- Cream cheese (8 oz, softened): Provides a rich and creamy base.
- Powdered sugar (1 cup): Sweetens the mixture perfectly.
- Whipped topping (8 oz): Adds lightness and fluffiness.
- Chocolate pudding mix (3.9 oz): For a rich chocolate flavor.
- Milk (2 cups): To mix with the pudding for a smooth texture.
- Graham cracker crumbs (1 cup): For a crunchy base.
- Chocolate chips (1/2 cup, optional): For added texture and sweetness.
Instructions
Step 1: Prepare the Cream Cheese Mixture
In a large mixing bowl, beat the softened cream cheese and powdered sugar together until smooth and creamy. This forms the base of your dessert and ensures a delightful texture.
Step 2: Add Whipped Topping
Gently fold in the whipped topping until fully incorporated. This step adds a light and airy quality to the mixture, making it irresistibly fluffy.
Step 3: Mix the Pudding
In a separate bowl, combine the chocolate pudding mix and milk. Whisk until the mixture thickens, which should take about 2 minutes. This will create a rich chocolate layer in your dessert.
Step 4: Combine Mixtures
Once the pudding is ready, fold it into the cream cheese mixture. Be careful not to overmix; you want to maintain the lightness of the whipped topping.
Step 5: Layer the Dessert
In a serving dish or individual cups, create layers starting with graham cracker crumbs, followed by the cream cheese and pudding mixture. Repeat the layers until all ingredients are used, finishing with a layer of the cream cheese mixture on top.
Step 6: Chill
Cover the dessert with plastic wrap and refrigerate for at least 2 hours to allow it to set. This chilling time is essential for the flavors to meld and the dessert to firm up.
Step 7: Serve and Enjoy
Before serving, sprinkle chocolate chips on top for added flair. Scoop out portions and enjoy the delightful combination of creamy, chocolatey goodness!


